
Edit a Media Library
Video
Media
Library offers instructors the option to manage media files within courses. The
Media Library allows the option for storing, reviewing, and editing video
files. Media Library provides an opportunity to professors to edit videos
before publishing them in content for students to access. This tutorial
demonstrates how to edit a video within Media Library in MyFIRE.
1. Access
Media Library by selecting the admin tools gear icon in the right top
corner of the screen.

2. A
drop-down menu will appear. Select media library.

3. When
the page refreshes, a list of all of the media files that you have uploaded or
created in your courses will be listed under your my media folder on the
page. Locate the desired video.

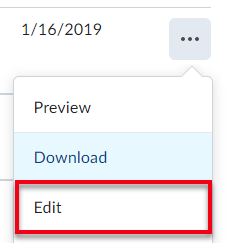
4. Once
the desired media library video has been located, select the ellipsis icon to the right of the file.

5. From
the drop-down menu, select edit.
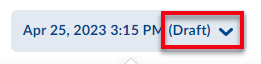
6. The
page will refresh, and the video will be visible. In the top-right corner of
the page, the status of the video will be displayed. Video status will include saved or unsaved.
7. During
the editing process, save changes made to a video to reduce the potential of
lost edits by selecting save draft. The save draft button will not be
clickable until an edit has been made.

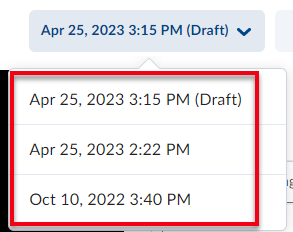
8. Users
are able to view and access multiple versions of a video by selecting the revision
history drop-drop menu.

a. If an edit is saved as
a draft, the revision history will state that the version is drafted.
b. If needed to review an
older version of the video, select an older version from the drop-down
menu.
c. If desiring to
republish an older version of a video, ensure that the older version of the
video is selected in the revision history menu.

d. Select save draft.
This action will set the older version of the video to the current version and
allow you to continue making any necessary changes.

9. During
the editing process, if you would like to switch the editing language and
closed captions on the screen, select the language drop-down menu.
English is the default language. Note: The language option is only
available for the video editor. The video language and closed captioning will
save and be presented to students in English.

10. Reviewthe video to determine if edits are needed by using the playback
menu at the bottom of the video.

11. If
the video needs to be cut or trimmed, locate the initial spot where the cut
should begin on the editor bar as you play the video. Note:
ID&T recommends working slowly through the editing process to ensure that
the changes made are completed correctly. Editing capabilities will be limited
based on the length of the video.

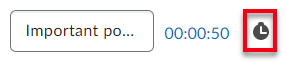
a. To quickly and easily
find the location that needs to be edited in the video, select the seek icon on the right side of the page.
b. Select the mark icon on the right side of the page.

c. Mark the playbar to
indicate the section of the video that should be cut.

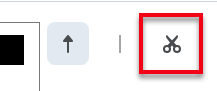
d. Select the scissors
cut icon.
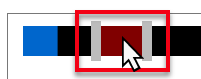
e. Then select the
section that should be cut next to the marker(s). Once selected, the area will
turn red indicating that portion of the video has been cut.

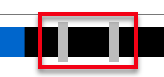
f. If needing a larger
view and zoom into the editor bar, select and drag the gray horizontal bar that is located beneath the editor bar. The gray bar turns blue once moved from
it’s original width.

12. Next,
under the Table of Contents section, add chapters to the video as
needed. Chapters designation important points in the video or where new topics
in the video begins.

a. To add a chapter, use seek
icon to locate where the chapter should be identified in the video.

b. At the bottom of the
Table of Contents area, type the title of the chapter.
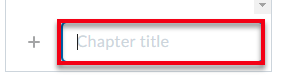
c. Select the plus icon.

d. The chapter marker in
the play bar will turn blue, and the chapter will be visible under the table
of contents.

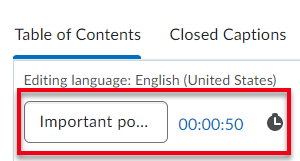
e. If needing to edit the
location of the chapter, move the seek bar to the desired location, and
select the clock icon to the right of the chapter title.

f. If needing to edit the
title of the chapter, select the chapter title and type the new title.

g. If needing to delete a
chapter, select the ‘X’ icon to the right of the chapter title.

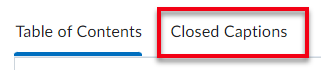
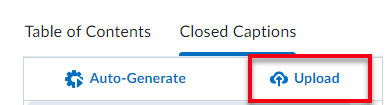
13. Next,
select closed captions heading.
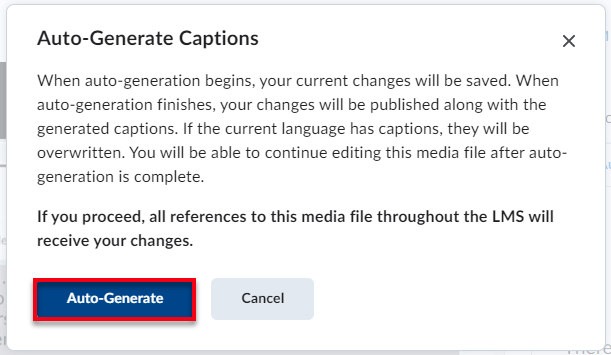
a. Option 1: Select auto-generate to request the system to auto generate the closed captions from the
video.

i. A pop-up window will
appear confirming if you would like to proceed with auto-generating the
captions. Auto-generating the captions will override any previously added
captions and language settings. Additionally, the video will be automatically
published. The video can be edited once again after it is published if desired.
Select auto-generate to confirm.
ii. Once selected, the
video revision will process to create the captions. This process may take a
few minutes depending on your internet speed and the length of the video.

iii. Once the video has been
processed, navigate back to the closed caption area to review and edit the captions if necessary. Each caption’s words and timing is editable.
1. To change the words in
the caption, type in the caption textbox.

2. To change the timing of
the caption, select the arrow icon to the right of the caption. The
settings will expand.

a. Enter the desired start and end times for the specified caption.

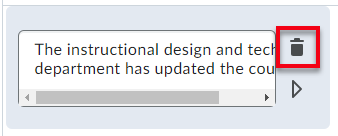
3. If needed, select the trashcan
icon to delete a caption.
b. Option 2: If desired, upload
the captions through a .VTT file by selecting upload.
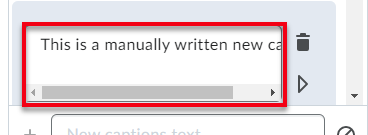
c. Option 3: Locate where the
caption should be by moving the seek bar to the desired location. The
caption that the video is on will have a blue border.

i. At the bottom of the
Closed Captions area, type the caption in the textbox.

ii. Select the plus icon,
and the manually written caption will be added to the caption list.
14. Once
the desired edits have been made, choose to save the edited video by selecting save
draft or finish to publish.
