
Any
Teams meeting or call can be recorded for future viewing. The recording
captures audio, video, and screen-sharing activity.
· Meeting recordings
won't capture whiteboards, annotations, or shared notes, and will not include
videos or animations embedded in PowerPoint Live presentations.
· Downloads of videos
will not include transcripts, chapters, and comments.
· When viewing a meeting
recording, you'll see no more than four people's video streams at once.
· Maximum recording
length: 4 hours or 1.5 GB. When this limit is reached, the recording will end
and automatically restart.
· Recording continues
even if the user who started the recording has left the meeting.
· The recording stops
automatically once everyone leaves the meeting. If someone forgets to leave,
the recording automatically ends after 4 hours.
The
best practice is to upload a copy of the recording to the course in MyFIRE.This tutorial will
demonstrate how to record a Microsoft Team meeting and publish the recording in
MyFIRE.
1. While
in a Microsoft Teams meeting, select the more actions ellipsis icon in the meeting controls.

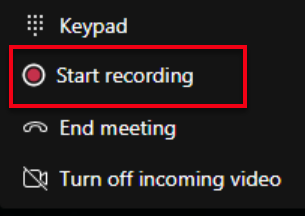
2. A
menu will appear. Select start recording.
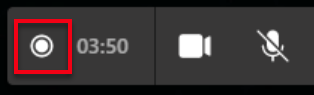
3. When
the recording starts, everyone in
the meeting will be notified that the recording and transcription have started,
and the recording icon will appear next to the meeting's length of time.
4. When
ready to stop recording, select the more actions ellipsis icon in the meeting controls once again.
5. Select stop recording from the menu.

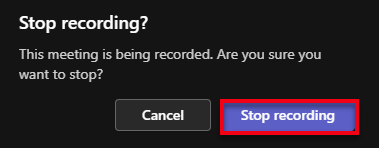
6. A
pop-up window will appear asking to confirm if the recording should be stopped.
Select stop recording.
7. A
pop-up notification will appear in the meeting stating that the recording is
being saved.

8. After
the recording has stopped, it's processed (which could take a while depending
on your internet speed and the length of the recording) and saved to Microsoft
Stream. The recording will appear in the meeting chat once available. Select
the chat icon in the meeting
controls.

9. The
chat panel will open on the right side of the page. Once the recording has
finished, select the meeting.

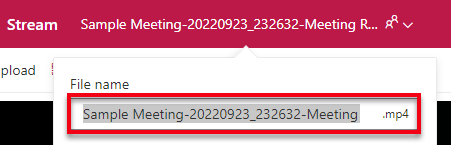
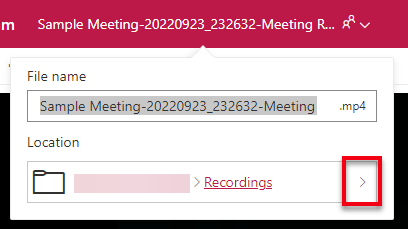
10. The
recorded meeting will open in a new browser tab within Microsoft Stream. In the
top left corner of the screen, select the drop-down arrow to the right
of the meeting title.

11. Rename
the recording in the file name field.
12. If
desired, change where the file is located in your Microsoft Stream account by
selecting the right arrow in the location field to keep your account
organized according to your discretion.
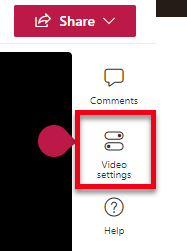
13. Next,
select video settings on the right side of the page to turn features on
or off to change how your students experience the video recording playback.
Changes to the video settings will apply to all viewers. Note:
Downloads of videos will not include transcripts, chapters, and comments.
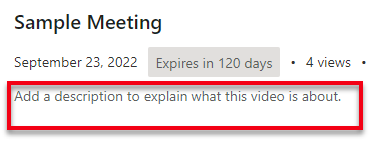
a. Determine if the
meeting information should be displayed for viewers by toggling on or off about
video. This setting is turned on by default. If turned off, the information
below the video on the screen will disappear.

i. If desiring to keep the
about video information enabled, add a description about the video in
the description field.
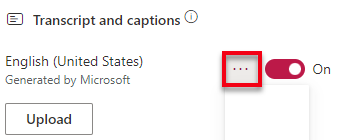
b. If desiring to obtain a
copy of the transcript and captions for the recording, select transcript and
recording, and then select generate. The transcript will be a
separate download file from the video recording.
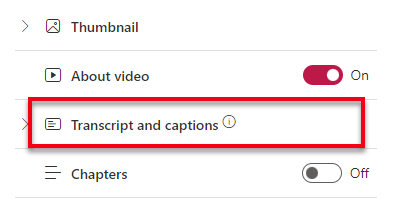

i. Next, select the
language spoken in the video from the spoken language down-down menu,
and then select generate once again.

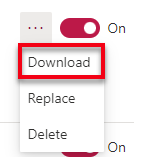
ii. After waiting a little
time, select the ellipsis icon to the right of the language.
iii. From the drop-down
menu, select download to save a copy of the transcript.
iv. Open and edit a VTT
file using any text editor, such as Microsoft Notepad (Windows), Apple TextEdit (Mac), or GitHub Atom (multiplatform). You can also view a VTT file's contents by dragging
the file into any web browser
v. Copy the transcript into a Word or
Google document and save the file as desired.
c. If desiring to enable
noise suppression for the recording select noise suppression and then
select the set as default for this file checkbox.

14. Once
the video settings have been set, select the ellipsis icon below the
meeting title in the top left corner of the screen.
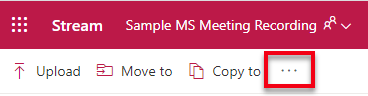
15. Select download.

16. A
pop-up message will appear to confirm your decision. Downloads of videos will
not include transcripts, chapters, and comments. Select download.

17. Once
the recording has been downloaded, locate the file in your downloads
folder, and View the file size. If the file size is larger than 2 GB
(equivalent to 2000 MB & 2,000,000 KB), then the video file will need to be
compressed before continuing to the next step.
a. If the video file needs
to be compressed, a few options that are available to compress video files
are:
i. https://www.freeconvert.com/video-compressor
ii. https://www.youcompress.com/
iii. https://clideo.com/compress-video(video will contain a
watermark)
iv. Handbrake (This is downloadable software. If utilizing an SEU computer, you may need to
contact the SEU IT department for assistance.)
18. Login
to MyFIRE.
19. Navigate
to the desired course.
20. On
the navigation bar at the top of the page, select the content &
assessments tab.
21. Follow
the directions in the How to Upload a File to a Module video
tutorial to publish the recorded Microsoft Teams meeting to the course for
students. If needed, also upload a copy of the transcript.